Every drywall contractor hears the same first question: "Roughly what's this going to cost?" A contact form answers it with a promise to call back. The homeowner fills it out, waits, and has every reason to keep looking while they wait.
A drywall estimate tool answers the question on the spot. The homeowner picks the rooms, enters square footage and finish level, and gets a real number built on your pricing. Call it an estimate tool or a drywall quote calculator for your website; the job is the same. The lead that reaches you already has the job scoped and priced.
Here is how it works, what it should ask, and how to set the numbers so they hold up at the walkthrough.
Why a number beats a contact form
Homeowners can find national averages in a few seconds. HomeAdvisor's drywall installation cost guide, for example, puts a 12 x 12 bedroom at $600 to $1,800 for materials and installation, and says most homeowners spend between $1,000 and $3,254 on an install. Those are national ranges. They don't know your rates, your town, or whether this homeowner wants a Level 5 wall.
Your estimate tool does. It turns a national spread into your number while the homeowner is still on your site, and it hands you a lead worth calling back first.
How the Samaniego Drywall tool works
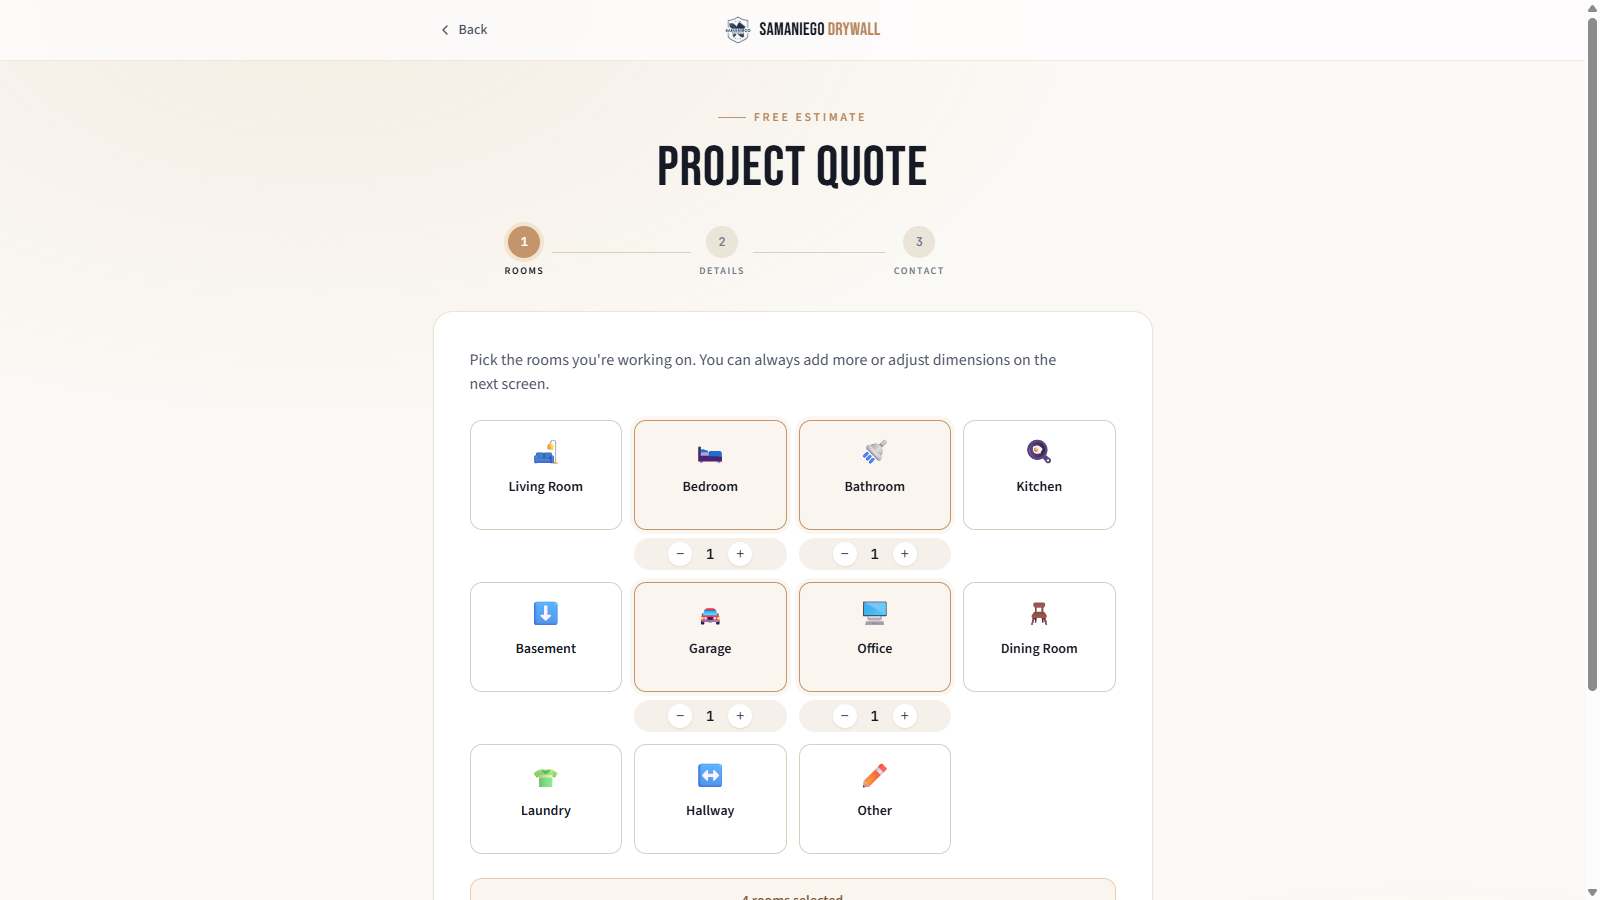
When we built the site for Samaniego Drywall, a family crew in Dane County, Wisconsin, the project estimate tool was the center of it. It runs in three steps:
- Rooms. The homeowner picks the spaces that need drywall: bedroom, bathroom, basement, garage, office and more.
- Details. Square footage, finish level and timeline.
- Contact. Name and number, and the lead lands with the crew.
The homeowner gets a real number back. The crew gets a lead that says what the job is, how big it is and what finish it needs. Follow-up goes out by email and text. Over $50,000 in estimated project value has moved through the tool, and the Samaniego Drywall case study covers the whole build, from paper binder to working system.
What your estimate tool should ask
Keep it short enough to finish on a phone and specific enough to price. For most residential drywall work, these are the inputs that matter:
- Job type. New hang and finish, basement, remodel or addition, repair, ceiling work. Each prices differently.
- Rooms and room sizes. Let them pick rooms, then adjust dimensions. Ask for room size, not wall area, and let the tool do the math.
- Finish level. One plain line each. Level 4 for flat paint and light texture. Level 5, which adds a skim coat over the whole surface, for glossy or dark paint and walls under critical lighting. That's how National Gypsum describes the GA-214 finish levels.
- Ceilings and texture. Ceiling height, texture matching, popcorn removal if you do it.
- Timeline. Next week, next month, or just planning.
- Zip code. It tells you whether the job is inside your service area before you ever call.
- Photos, optional. A picture of the water damage or the open studs can save a trip.
Build it for a thumb, not a desk
Picture the homeowner standing in the room that needs the work, phone in hand. Design every screen for that moment.
- One question per screen. Rooms on one screen, details on the next, contact last. A short form that moves feels shorter than a long one that sits still.
- Tap, don't type. Rooms, finish levels and timelines work best as big buttons. Save the typing for square footage and contact details.
- Show the progress. "Step 2 of 3" tells the homeowner the end is close.
- Ask for contact details last. By the time they reach that step, they have already described the job and want to see it through.
- Say what happens next. A line like "we'll follow up by email and text" sets the expectation, and the follow-up then meets it.
How to price it so the number holds up
The tool is only as good as the numbers behind it. Build them from your own jobs, not from a national average.
- Start from your square-foot rates for hanging, taping and finishing, by finish level. Level 5 carries a skim coat over the whole surface, so price that labor in.
- Add extras separately: high ceilings, texture, popcorn removal, demo and haul-away.
- Set a minimum job charge so a small repair always covers the cost of showing up.
- Show a range, and say the walkthrough sets the final price. The homeowner gets an honest answer, and you keep room for whatever you find behind the old board.
- Revisit the numbers each season. Material and labor costs move, and your tool should move with them.
A generic calculator vs. a tool built on your pricing
| Generic square-foot calculator | Estimate tool built on your pricing | |
|---|---|---|
| Where the number comes from | National averages | Your rates and your minimum |
| What it asks | Square feet | Rooms, square footage, finish level, timeline |
| After the number | The homeowner keeps it to themselves | A lead lands with you, scoped and priced |
| Follow-up | None | Email and text go out when the estimate comes in |
| What you learn | Nothing | Which jobs are worth a walkthrough |
What happens after they hit submit
This is where the tool earns its place. In the system we build, when an estimate comes in:
- The homeowner gets an email from your business and a text to their phone while the number is still fresh.
- You get the lead with rooms, square footage, finish level, timeline and the estimate attached.
- You call back the jobs worth a walkthrough, starting with the ones you want most.
No flipping through a binder or scrolling old texts to find what someone said about their basement. The whole job is on one screen when you call.
Will a price turn customers away?
It sorts them, and that works in your favor. The homeowner hunting for the cheapest possible patch sees a number and moves on without costing you a drive. The homeowner who finishes the tool, already knowing roughly what their basement will run, is ready for a walkthrough.
For a crew of one to five, that trade is the whole point. Your week goes to jobs worth doing, and the calls you make are to people who already have a number in hand.
Where to start
If you already have a website, the tool goes on it, linked from every page. If you don't, the tool is a good reason to build one. Either way it works best inside a system: the site that brings homeowners in, the tool that prices the job, and follow-up that answers them.
See how we put those together on our drywall contractor page, and read what a drywall contractor website needs for the rest of the build. If you're weighing where your leads come from in the first place, how to get more drywall jobs without buying shared leads lays out the options.
If you run a crew of one to five and want every lead to arrive with a number on it, answer four quick questions below and we'll tell you whether we're the right fit.